
Installing a hardwood floor over a concrete slab
Even if your home was built on a concrete slab, you can still enjoy the beauty and charm of hardwood floors. Experienced professionals pay close attention to managing moisture and minimizing wood floor expansion and contraction when preparing to install hardwood floors on concrete slabs. Here are items you should consider before the job is started.
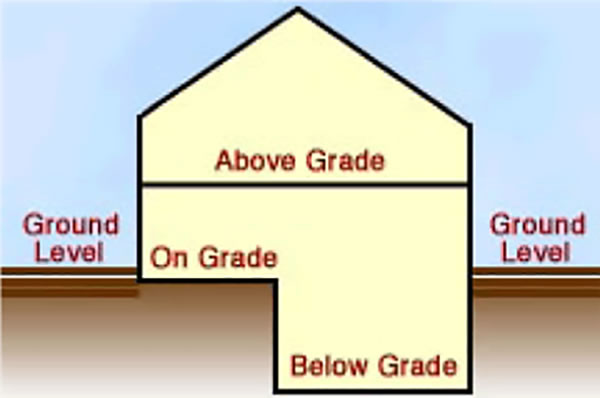
At or Above Grade
With dry concrete and the right subfloors and vapor retarders, solid hardwood floors can be installed on slabs that are either on-grade (at ground level) or above-grade (above ground level). Moisture can pose problems for solid hardwood floors below ground level, so engineered wood floors (made of layers of wood glued together) are the best choice there.
Protect the Flooring
Wood floors should not be subjected to very wet conditions. Before delivery to the site, the building should be closed-in with outside windows and doors in place. All concrete, masonry and sheet-rock should be completely dry. In warm weather, the building should be wellventilated. In winter, heating should be maintained near occupancy levels at least five days before the flooring is delivered and maintained from that point on.
Dry Slab
Concrete slabs, whether new or existing, must be dry before the subfloor is installed. For best results, several areas of each room should be tested for excess moisture. If tests indicate too much moisture is in the slab, do not install hardwood floors. A new moist slab should be allowed to dry naturally or the process can be hastened with heat and ventilation. Slabs less than 60 days old are generally too wet to install floors.
Test for Dryness
New concrete is heavy with moisture, and it must be a minimum of 30 days old before moisture testing begins. Determining moisture content of both the wood flooring and the subfloor is an important part of quality control in the flooring installation process. Detailed qualitative and quantitative testing methods are provided by the National Wood Flooring Association.
National Wood Flooring Association – Moisture Guidelines and Moisture Testing*
Flat, Clean Slab
The slab must be flat with a trowel finish, free of grease, oil, stains and dust. Grind off any high spots and fill any low spots.
Vapor Retarder
With solid hardwood floors, a proper vapor retarder must be installed on top of the slab to make sure normal slab moisture does not reach the finished floor. Layers of asphalt felt with asphalt mastic or 6 mil polyethylene sheathing are some of the choices.
Subfloors
The National Wood Flooring Association recommends two choices in sub-flooring systems for concrete installations: plywood-on-slab and sleeper. Either subfloor system is satisfactory for three-quarter inch flooring.
Plank Flooring
Plank flooring four inches and wider requires either the plywood-on-slab system or the sleeper system topped with a minimum of 5/8” inch thick plywood or ¾” OSB.
Plywood on slab
Begin by covering the slab with a vapor retarder.
Asphalt felt or building paper: first, prime the slab and apply cold, cut-back asphalt mastic with a notched trowel (50 sq. ft. per gallon). Allow to set for two hours. Unroll 15-lb. asphalt felt or building paper, lapping the edges 4″ and butting the ends. Over this, apply a second similar coating of mastic and roll out a second layer of asphalt or paper in the same direction as the first, staggering the overlaps to achieve an even thickness.
Polyethylene: Cover the entire slab with 4 to 6 mil polyethylene film, overlapping the edges 4″ to 6″, and allowing enough film to extend under the baseboard on all sides.
When moisture conditions are more severe, prime the slab and apply cold, cut-back mastic with a straightedge or fine-tooth trowel (100 sq. ft. per gallon). Lay 4 to 6 mil polyethylene film over the slab, overlapping the edges 4 to 6″.
In either case, roll the film flat or “walk” it in, stepping on every square foot to ensure adhesion. Puncture bubbles to release trapped air.
Install the plywood after the vapor retarder is in place. Loosely lay a nailing surface of 3/4″ 4′ x 8′ exterior plywood panels over the entire area, leaving a 3/4″ space at the wall line and 1/4″ to 1/2″ between panels. Cut plywood to fit within 1/8″ near door jambs and other obstructions where finish trim will not be used. Lay plywood diagonally across the direction of the finished floor to help prevent cracks along panel edges.
Fasten plywood to the slab with power-actuated fasteners, securing the center of the panel first, then the edges, spacing fasteners 2” from the edges every 6-8” along the perimeter and 1 fastener spaced approximately 12” apart within the interior of the panel.
Do not use power-actuated fasteners or concrete nails when radiant heat pipes are embedded in the slab. Instead, cut the plywood into 2′ by 8′ planks and score the backs 3/8″ deep on a 12″ grid. Lay panels in a staggered pattern with at least 2′ long planks along starting and finishing walls. For systems other than radiant heat, the plywood planks may be glued to the plastic with asphalt mastic. Spread using a 1/4″ by 1/4″ notched trowel.
Floating subfloor of 2 layers of plywood secured together over a vapor retarder. No fasteners penetrate the retarder or the concrete.
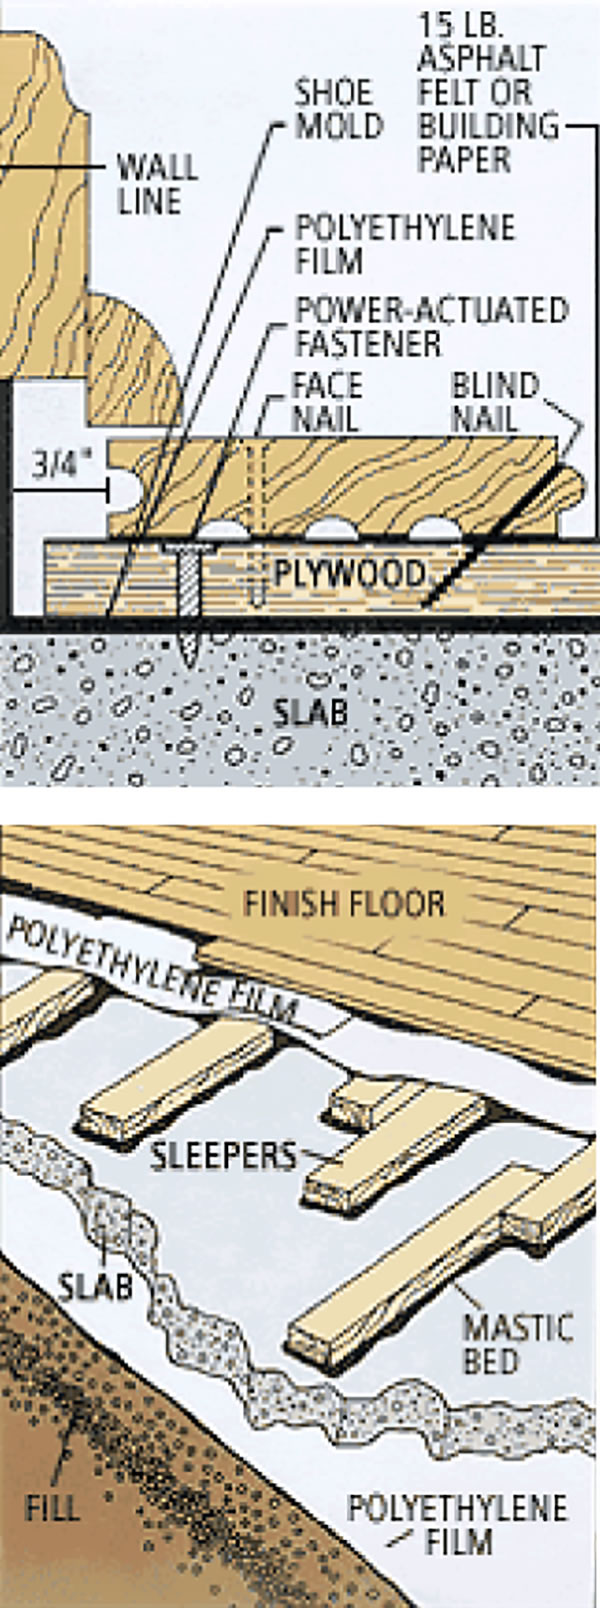
Sleepers
Flat, dry, kiln-dried, preservative-treated 2″ x 4″ sleepers in random lengths (18″ to 48″) can also serve as a nailing base. Otherwise, yellow pine, fir or other kiln-dried framing species is acceptable.
Begin by sweeping the slab clean, applying an asphalt primer and allowing it to dry. Next, embed the sleepers on their flat faces in rivers of hot (poured) or cold (cut-back) asphalt mastic, in rows 6-7” on center, at a right angle to the direction of the finished flooring. Stagger the end joints, overlapping the ends 4″, with 1/4″ space between.
Before installing the floor, loosely lay an additional vapor retarder of 4 to 6 mil polyethylene film over the sleepers, overlapping the edges on top of the 2 x 4s. Avoid bunching or puncturing the film, especially between sleepers.
Nail the finished flooring to the sleepers through the film.
Acclimation
When the site is prepared, the flooring can be delivered and stored in each room where it will be installed. Flooring is considered acclimated when the moisture difference between the wood and the subfloor material is within 4% for flooring less than 3” in width. For any flooring 3” or wider the difference should be within 2% mc. Without a proper moisture meter, you cannot determine if the flooring has been properly acclimated. The flooring should be removed from its boxes and all packing materials during this process.
Mastics and Trowels
Hot asphalt is generally used only for laying screeds on concrete, and the screeds must be positioned immediately upon pouring the mastic (always follow manufacturer’s directions).
Cut-back asphalt, chlorinated solvent and petroleum-based solvent mastics are all applied cold and are used for laying tongue-and-grooved block and parquet floors. Cut-back asphalt mastic can be used to hold a recommended vapor retarder and/or to glue a plywood sub floor to a slab. (Follow your manufacturer’s instructions on coverage, drying time and ventilation.)
Use a notched edge trowel when a correct mastic thickness is specified.
Gluing Solid Parquet Flooring Directly to a Concrete Slab
Solid parquet hardwood flooring can be glued directly to a concrete slab on grade or above grade with the use of a manufacturer recommended vapor retarder. Solid parquet should not be installed below grade. The entire flooring level is considered to be below grade where soil is present along any perimeter wall and is more than 3″ above the installed wood flooring level. A vapor retarder is always required over the concrete slab and below the subflooring material. A minimum 6 mil construction grade polyethylene film, with perm of .13 or other impermeable material with a perm of .15 or less is recommended. Some manufacturers allow direct glue installation of 3/4″ solid parquet flooring. In such cases, follow wood or adhesive manufacturer’s recommendation. NWFA recommends using the manufacturer’s suggested adhesive. Successful installation also requires conducting a concrete slab moisture test before parquet installation.
NOTE: Always follow manufacturers’ directions as some manufacturers may allow direct glue-down applications and/or recommend nailing and gluing to a substrate.
Most all strip/plank flooring can be installed over an approved subflooring material with approved mechanical fasteners (cleats, nails, or staples). Solid flooring may be installed directly to the slab.

