
How to Install Ceramic Overlay
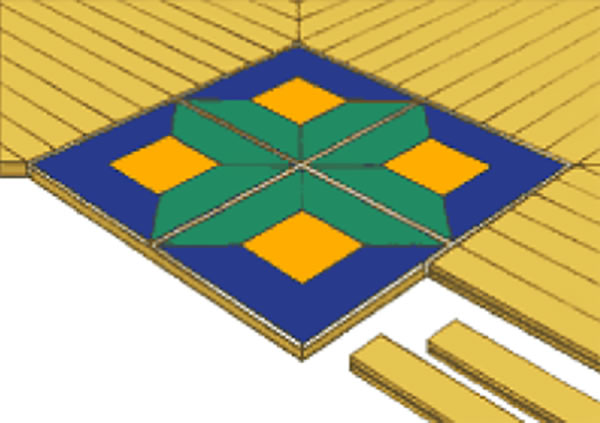
Ceramic tile medallions are popular custom accents for hardwood floors. This step-by-step guide details installation of a 2′ square ceramic tile medallion installed 45 degrees off center (diamond-style) in the middle of a room, and surrounded by a hardwood floor. The dimensions of the room are 12′ x 12′, with a 3/4″ plywood subfloor. The hardwood flooring is unfinished, 3/4″ thick, 2 1/4″ wide, select red oak. The medallion is four 12″ x 12″, handpainted, ceramic tiles that are 1/4″ thick (see illustration).
Since the ends of the hardwood flooring abut the secondary material, the flooring in this project will have a “fanning” effect as it works out from the medallion.
Installation
Keep in mind that each building material is unique and often many factors idictate which material is installed first.
In this instance, you’ll install the ceramic tiles first because it is easier to work around the smaller inlay. Since the tiles are 1/4″ thick and the hardwood flooring is 3/4″ thick, you’ll need to add a 2′ x 2′ square of 1/2″ plywood under the medallion inset to make the two materials level.
Once you’ve anchored the 2′ x 2′ plywood lift, follow the manufacturer’s guidelines to install, grout and finish the tile, allowing necessary drying times.
It’s important to finish each material as you install it. You installed the tiles first, so they should be finished before beginning work on the hardwood flooring. Always follow the manufacturer’s instructions when finishing and cleaning these secondary materials because some are pre-finished.
Remember that most secondary materials are cleaned with water, which can damage your neighboring hardwood flooring. To protect against moisture damage, thoroughly seal the sides and bottoms of any hardwood that you’ll install next to the medallion.
Hardwood Flooring Direction
Once the tiles have completely set, carefully cover and mask off the medallion while you work on the hardwood flooring.
Remember to plan around the wood’s tendency to expand and contract.
In most instances, hardwoods will expand and contract more across the width of a board than along its length. For this reason, you should try to install the hardwood flooring strips with the ends abutting the other building material when possible.
These precautions allow hardwood to expand and contract more freely without putting any direct and unnecessary stress on the secondary material.
Layout and pre-planning for the predicted expansion of the wood flooring is critical. Wood direction, orientation and starting lines may change with each installation.
For each side of the diamond, start in the center and use a slip tongue for reversing direction at the mid-points of the walls, where the 45 degree miters are aligned with the diamond points. Remember to join the hardwood and ceramic tiles with a flexible grout, leaving between 1/8″ to 1/4″ for the wood’s expansion and contraction.
If the flooring is unfinished, make sure the secondary material is still masked off before applying any stains or finishes.

